Introduction: What is Ballooning in Technical Drawings?
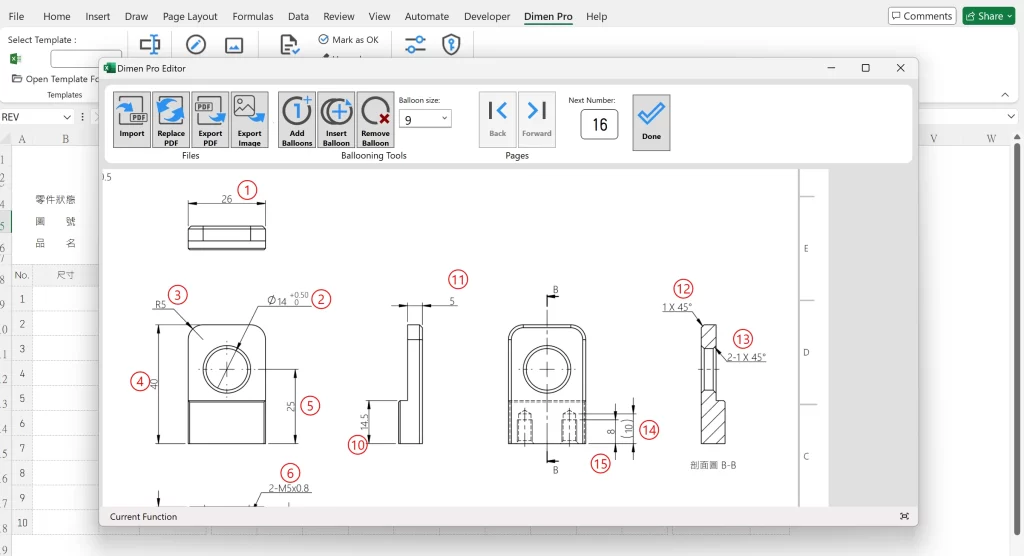
In quality inspection, “ballooning” a drawing refers to marking key features with numbered circles, or balloons, on an engineering drawing. This process simplifies identifying each dimension, feature, or tolerance that requires verification, allowing inspectors to track, measure, and record results methodically. Ballooned drawings have become a critical tool for creating First Article Inspection (FAI) reports, as well as for other documentation that involves precision measurement, making them a valuable asset in any quality control or manufacturing environment.

The Purpose of Ballooning in Quality Control
Ballooning adds structure and clarity to quality inspection by marking each element, such as holes, lengths, or tolerances, with a unique identifier. It serves three primary purposes:
- Easy Identification: Ballooning enables inspectors to immediately recognize and locate specific features on a drawing.
- Efficient Tracking: With every feature assigned a unique number, recording measurements and comparing them to requirements becomes streamlined.
- Error Reduction: A ballooned drawing minimizes the risk of overlooking or duplicating measurements, which is especially helpful when complex parts are involved.
By aligning the ballooned numbers with an inspection report, inspectors can systematically verify each measurement and reduce the risk of missing crucial details.
Benefits of Using Ballooning Drawings in FAI and Quality Control
Traditionally, ballooning is done manually or using standalone software, but Dimen Pro offers a streamlined alternative directly within Excel. This approach offers several advantages:
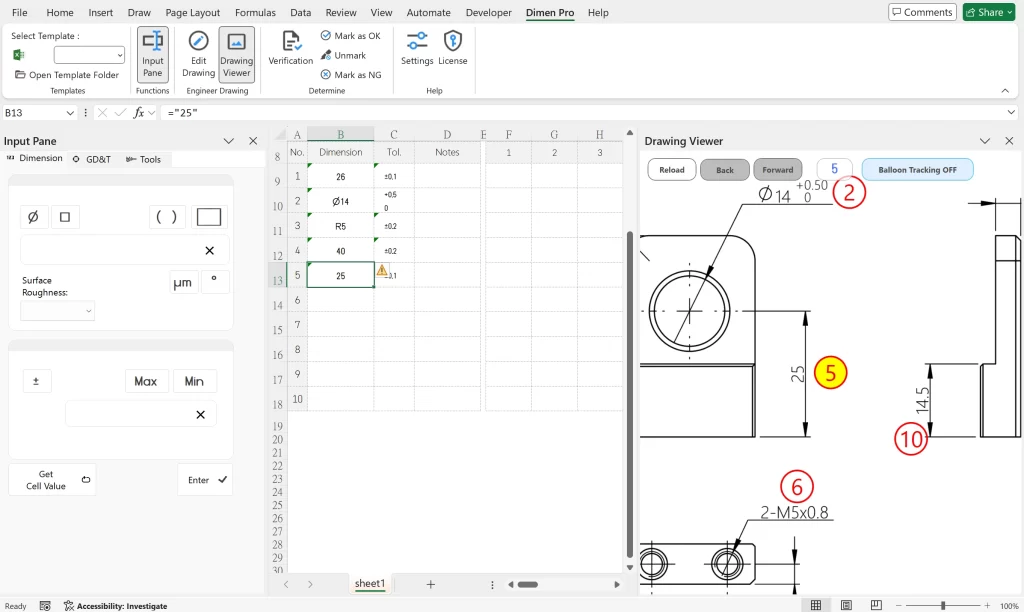
- Integrated Workflow: Dimen Pro allows users to create ballooned drawings and link them directly to an inspection report (or dimensional report) in Excel. This eliminates the need to switch between multiple software applications.
- Synchronous display of drawings: Display drawings and Excel tables simultaneously, and automatically track Ballooned numbers based on numbers. Whether you are preparing templates, measuring dimensions, or viewing dimensions, you can easily track each feature.
- Simplified Validation: Dimen Pro provides built-in validation to highlight any measurements that fall outside tolerance limits.
Dimen Pro is more than just a tool for creating ballooning drawings and inspection templates; it’s designed to support every stage of the inspection process, from measurement and validation to final review. By eliminating the need to constantly refer back to drawings for dimension verification, it significantly accelerates workflows, allowing inspection personnel to focus on their core tasks and produce high-quality inspection documents with greater efficiency.

Conclusion
Ballooning technical drawings is a best practice in quality inspection, particularly for FAI and similar reports that require a high level of detail and accuracy. With tools like Dimen Pro, ballooning and validating inspection data within Excel becomes more efficient, helping teams stay organized, reduce errors, and communicate more effectively across departments. By making the switch to an integrated ballooning and inspection solution, quality control teams can achieve a more streamlined and precise inspection process.
